


Frame Instructions
Our frames are designed to allow you to insert or remove material (i.e. diplomas, degrees, certificates, posters, artwork) in 30 seconds or less without the use of any tools.
Step 1: Place the frame unit face down on a flat surface (figure 1). Press and turn the swivel clips away from the frame moulding.(figure2)
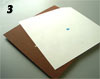
Remove the backboard and the grid matting paper. Place the backboard, clips down, on a flat surface. Place the line grid matting paper with the 'A/B' self-adhesive tab face up on the backboard, and square off all sides.(figure 3)
Step 2: Now remove the 'B' tab from the self-adhesive tab in the center of the grid paper.(figure4)
Caution: the adhesive is now exposed; therefore, gently place your material approximately in the center of the grid paper, being careful not to touch the center of the paper at this time.(figure5)
Step 3: Now remove the mat from the frame and place face up on the existing stack of material, grid paper and backboard, and again square off all sides. Now, with your hands on either side of the matting, gently press down on the mat as you lightly move your material into position with your fingers.
Once centered, lightly rub the center of the material to attach it to the adhesive.(figure6)
Step 4: Remove the Acrylic from the frame and carefully peel the protective film from both sides of the Acrylic. Put the Acrylic on the top of the existing stock of backboard, grid paper, material and mats.(figure7) Replace everything into the frame in one motion.(figure8)
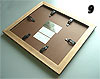
Fasten the top and bottom swivel clips only, then turn the unit over to check that all is centered (if not, repeat appropriate steps).
When all is centered, fasten the clips (figure9) and hang the frame, either vertically or horizontally on the wall. You may use the swivel clips or the frame when hanging.
Note: if you need to remove the framed material, simply remove the frame from the wall, turn over the frame and place on a flat surface and push and turn the swivel clips in a clockwise direction.
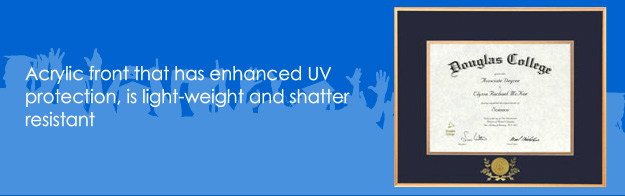
Protective Acrylic Film
The front face of the Acrylic in the frame has a protective blue coloured film. It looks this way because it protects the Acrylic front getting scratched or damaged through transport. Simply peel off the blue protective cover from BOTH sides of the Acrylic by grabbing one corner and pulling the film.Medallion
If your frame has a medallion in the mat and the medallion has shifted you are able to adjust and a-line the medallion yourself. Simply remove the material from the frame and adjust the medallion in the mat so it aligns properly. Shifting of the medallion may occur from transport but is easily fixable.Patented Swivel Clips
Leader Frames, 'clipped' the North American market with it's introduction of the swivel clip for aluminum metal and hardwood framing products. With its unique patented swivel clip system a simple push and turn provides instant insertion and removal of pictures, certificates, posters, documents or other pieces without tools. This designed has been further enhanced by it's flush-to-the-wall mounting capability without wires.